Rebuilding my RIA: The VooDoo that I do

So I’m starting this thread to document my trials and tribulations as I take a bone stock RIA “Rock Standard” through the modifications that I feel are prudent, necessary and more than likely just because I want to. I haven’t really worked on a 1911 in probably 15 years or so and I’ve been itching to build one, especially since I have the veritable “butt ton” of magazines, holsters and STUFF for a full size 1911. I used to build them for fun, profit and I actually used to shoot them, A LOT.

So let’s start with the bones of the gun. (forgot to take a right side pic before I started)

The Good and the Bad: Out of the box all the controls functioned as designed. The trigger pull was fair with a terrible reset. I would estimate about 3/16" release to get the trigger reset. The nice thing is that it came with a trigger reset screw and skeletonized trigger which allowed me to eliminate most of that. More on that later. The slide itself was tight right to left as well as up and down with barley a hint of lateral play. The barrel to bushing fit was also acceptably snug. With the slide locked to the rear and pushing the barrel back, the joint between the frame and feed ramp was very acceptable for ball ammo and even hollow points. The ramp will require polishing and contouring as will the barrel feed ramp but out of the gate it works. The sights are basic black with no dot’s or lines and they are of the Novak design which provides a multitude of options going forward.

The Ugly: Other than the trigger over travel the first thing that caught my attention was the Ambidextrous Safety (here after the “Ambi” refers to the right side of the safety). The left side was fine albeit a bit blocky. The right side was horrible with the extended safety pressing down on my trigger finger when disengaged. I also noticed that I could feel the flat of the safety moving in my grip. The next bit is a fit and finish issue which unfortunately is more common than not. The beaver tail safety was rough against the web of my hand after repeated gripping and would have cause some issues after firing.

So we will start with the two most glaring issues out of the gate: Re contouring and or eliminating the right side of the Ambi-Safety and re contouring the beaver tale grip safety to be comfortable when depressed as opposed to looking good sitting on the counter. So without further ado, here we go.

I didn’t happen to take a “before pic” but in this shot I was moving the bulk of thumb lever forward and had taken off two “ribs” in width. Basically contouring with a half round steel needle file. The ribs came off with a large flat file.

After the first iteration the flat of the safety was still dragging my hand sooooo more filing

Still not right

Still not right

My intention (not perfectly drawn with Sharpy) is to keep the portion from the rear parallel with the top of the safety until it sweeps down to the bottom. On the installed pics you can see the sear pin is notched and the safety rides in that groove. If I am still not satisfied at the end I will scrap it and get a left side only extended safety.

I’ve got the grip safety marked out but I’ll show those in a later post (actually you can see how much is going to come off the right side in the last pic). This is where it sits at the moment. I don’t promise timely or regular updates and it will probably progress in fit’s and spurts as the life of a Project Manager allows. Appreciate your thoughts, opinions and feedback.

Cheers,

Craig6

8 Likes

I respect anybody that recognizes all designs are a compromise and have the guts to change those compromises to fit their preferences :+1:

3 Likes

@Craig6 - great job :+1: . :fist_right: :fist_left:

Here is my story:
I’ve got RIA TAC Ultra.
After test firing on my range, I’ve decided to improve it a little.

I sent my gun to gunsmith for some work:

  1. BEFORE: Bad trigger pull and reset. AFTER: trigger and reset are SWEET :heart_eyes:

  2. BEFORE: Sharp thumb safety. AFTER: all trimmed, nice and even
    IMG_safety

  3. BEFORE: take down lever impossible to reassemble. AFTER: jumps into the place with light push (it has a wider inside notch)
    IMG_slide

  4. BEFORE: flat trigger guard (bottom part). AFTER: nice small undercut :heart_eyes:
    IMG_trigger

  5. BEFORE: parkerized finish (wasn’t bad, but had to be refinished because of trigger guard undercut). AFTER: DLC finish (no RIA logo anymore)
    IMG_ria-full

  6. BEFORE: magazine without round amount control. AFTER: nice holes to indicate rounds :muscle:
    IMG_magazine

And one adjustment done by myself:
7. BEFORE: orange, mat fiber, AFTER: nice, bright red fiber rod :v:
IMG_fiber

Conclusion: - RIA is a nice firearm… but needs some extra work.

5 Likes

@Jerzees

Nice selection of mods. I may have to look into that under the trigger guard cut out. I imagine that makes for a substantial increase in control ability as it will sit deeper in your hand, similar to my beaver tail cuts.

Well done!!

Cheers,

Craig6

2 Likes

@Craig6. Undercut made a positive difference. Gun sits better, however it created new disadvantage - once hand went higher, thumb safety started pinch my trigger finger.
IMG_finger

2 Likes

@Jerzees

HaHaHa!!! Welcome to the world of modification. One thing always seems to affect another. I will play with it and if I deem the mod to be worthy I’ll wait on undercutting the left side safety.

Your issue is the same as I had on the right side except it appears you are a South Paw.

On an instructor note (it may be just a point of demo pic) your grip seems twisted, too much curve. It looks like the gun should be about 12 - 20* more to the left for a straight recoil. Dunno if you are having random feed issues at the end of your shooting string.

Cheers,

Craig6

2 Likes

@Craig6
:clap:
Great instructing !!! The picture doesn’t show the truth :slightly_smiling_face: 
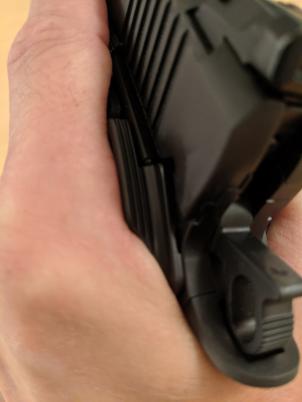
I had to make crazy moves to take a picture using my right hand. :joy:
Let’s say this photo has been taken for this thread purposes only…
“The event and entities depicted in this picture are fictional. Any resemblance or similarity to any actual events, entities or persons is entirely coincidental.”
:wink::sweat_smile::wink::sweat_smile:

2 Likes

Well I was all set to get to it on polishing the Ambi and start on the beaver tail and my doggone Dremel tool went down. The motor spins but the shaft won’t :rage:

Had one that lasted me 15 years the last three have only made it a year or two and I haven’t driven them near as hard as the first one. About ready to break out my Grandfather’s Foredom it’s 70 years old but will twist your wrist off when you start it

Cheers,

Craig6

2 Likes

So I finally got some time to myself and was able to get things going on the RIA. In the process I discovered that both of my Dremel tools are down so this will be a hand file installment. I’ve got a few before during and after photo’s that I am going to share. Be advised this is not “DONE” there is a whole lot more fit and finish to be accomplished but it does show you how far you can get with a hind file and an hour or two. My hands are not “soft” by any stretch of the imagination but having lived through shooting guns cut to look good laying there I am inclined to “adjust” them so that they are “smooth” when in use and that is what this beaver tail mod is all about.

First thing I did was strip the pistol down to bones. Then I taped it down in the position of function

Stripped

Left Side

Right side

I remembered that the trigger spring takes up space under the beaver tail so I installed it and the main spring housing so that the angles would work right with all the parts installed.

Begin

Getting there

Pretty close

A bit more polishing but all in all the contour is good and the angles are right. Once I get myself a new Dremel tool I can do the final polish and mating. Not bad for a couple hours or work.

Cheers,

Craig6

4 Likes

Looking good Craig! I will file down a trigger bow, fit a trigger, maybe smooth a rough edge off a sight, but I won’t start filing on a 1911. Don’t have the skills.

1 Like

@Fred_G I got you, the dirty little secret is I don’t either :hushed:. The fourth through sixth pics are going to cost me about $115 for a re finish so I better make it as good as I can.

Cheers,

Craig6

1 Like

Better you than me… LOL, but I enjoy seeing people work on their guns. $115 is not too bad for a refinish. You going to get it reparked?

1 Like

No I’m going to give Ceracoat or Ceramacoat a try this time. I think I would rather have hard chrome but those folks are hard to find, Truth is I am going to polish the hell out of it and then they are going to blast it with 60 grit rocks to even out the finish. Fortunately or unfortunately this pistol came with a beaver tail that the frame was under cut at the factory so I am going to have some gaps where I normally would not on a standard frame. I still can’t complain I’m $427 out the door an a couple hours of mental floss and it already sits MUCH better in my hand. Crawled through Brownell’s today and for another $208 + what ever finishing is will net me a top shelf stick when I am done.

Cheers,

Craig6

5 Likes

So I got some more free time today and with my new Dremel tool decided to get busy. Dremel tool’s and I have a love/hate relationship in that while they save you bunches of time they can get you into hot water VERY quickly. First up I needed to knock down a bit more of the grip safety and contour match it to the frame.

After some careful grinding and a bit of polishing we have

The next bit on the agenda was to finish the cut contour of the right side ambi safety. You can see in the last post where I left off and in this pic where I finished up at today.

Here it is the ambi in OFF position and in the position of function.

As with anything custom you better check everything else because one change affects other components. In this case the gun sits lower and back in my hand. Now the Left Side Safety has a sharp edge / rub issue

After a bit of grinding I moved the leading edge of the safety forward and contoured the underside to knock down the sharp edges Then I had to contour the back and flats to make it look and feel right.

While I was at it I diamond filed the Back of the left side safety so that it would quit rubbing the frame. The circles are the casting holes from manufacture. I just leaned in the file towards the edge to give it a clearance chamfer. One of these days I will get around to ordering an extended slide stop and even if no fitting is required I will do that to the backside of it as well as the frame steel is showing already.

20191005_161245

With the aid of a black Sharpie you can see how the lines lay down without all the reflection.

20191005_163254

Randomly in the above pics you can see where the Dremel got away from me in a few spots. Fortunately none of them were terminal or very deep. Since the frame (and parts) will be getting refinished it didn’t even cause me any significant heart palpitations. From experience, if you do that on a stainless frame you have to carry it for 15 years to get enough wear and scratches that you don’t notice the Dremel marks. On the other hand no amount of wear will cover up when you dropped your hand “just a bit” for one stroke with a hacksaw.

I may end up taking a bit more of the left side safety off as I am not sure how I feel about it yet, I will probably keep the same contour or ease the outside forward just a bit more to mirror the right side. That said I am pleased enough with the ambi that I don’t feel the need to order a single sided safety. Yay Me!!

I’m still debating on the under the trigger guard cut. I guess next will be my world famous throat and ramp job and giving some love to the rubby bits inside. I’ve already decided that the hammer needs a crew cut as it moves way too much when it gets run over by the slide which beats up the sear surface, so that will have to happen. He!! I may even put it back together and shoot it first. Time will Tell.

Cheers,

Craig6

4 Likes

So I was sitting there after dinner ruminating over a glass of Elk Creek and pawing the frame. I came to the realization that my trigger finger was significantly rubbing against the frame above the trigger since modifying the beaver tail. Then I started thinking and determined I knew what had to be done so I started drawing. Then I took a few measurements to see how thick the frame was where I was going to do some magic. I convinced myself that there was enough meat to do a pretty aggressive cut.

20191005_201856

About 20 minutes later here was the result.

20191005_211534

Now the frame drops right into my hand and the trigger finger is completely unencumbered. Lesson learned while ruminating with lubricating fluids be careful when the creative juices start flowing.:stuck_out_tongue_closed_eyes:

Cheers,

Craig 6

3 Likes

Just a quick up date: Dropped the frame off at DOA Arms in VA Beach today for some “Satin Aluminum” Ceracoat. I’ll get it back in a week or two.

Now I need to order some parts and get ready for the slide treatment. For $215 they can mill the slide serrations in the front of the slide to match the back of the slide, coat it and all my little pieces parts to go with.

Never had a gun too pretty to shoot but this may be a first :crazy_face:

@Zee they actually had a Canik on the shelf and I got to play with it. Not bad. They also had this little bitty CZ something or another in 9mm with a semi-stagger mag, Interesting.

Cheers,

Craig6

2 Likes

@Craig6 Cant wait to see pics!

I’m getting to be quite a fan of the Caniks :grin:
Did you get to shoot it?

No just fondle, they don’t have a range. It felt pretty good. They even had one that over hung the back of your hand by 4 - 5 inches that looked interesting but I was running out of time and had to boogy.

Cheers,

Craig6

1 Like

I’m not sure which that is… gonna have to find out!

An update:

So I got finished carving on my frame and sent it off to DOA Arms here in VA Beach for a coat of Satin Aluminum last week. Today I picked it up! I have to say that I a am pretty impressed with how the coating laid down and filled all the nooks and crannies that I was worried about. It looks just like … well bead blasted aluminum.

Unfortunately with any brand new coating on it there were a couple minor spots that I didn’t notice or that were hiding under the parkerizing job but nothing major. With the hoidaze coming up the odds that I will be able to buy the two parts I want to add (extended slide release & S&A Magwell) and send the slide and small parts off for milling and coating are slim. To that end I will cold blue the parts that I have worked on for the time being so that I can go shoot it and see how she runs.

I really like the way the frame stands out with the backstrap color as opposed to the regular parkerizing but the slide does look good mounted up. The trick will be not to scratch it before finishing it but that too will come. So on to a bit more polishing and grinding on the small parts and another try at cold blue and we’ll see what she looks like after that.

Cheers,

Craig6

3 Likes